How to use the Scheduler
First of all, there’s a need to create a new rule (rules) for the Scheduler. It can be done by clicking the “Add rule“ blue button in the middle or upper right of the page.
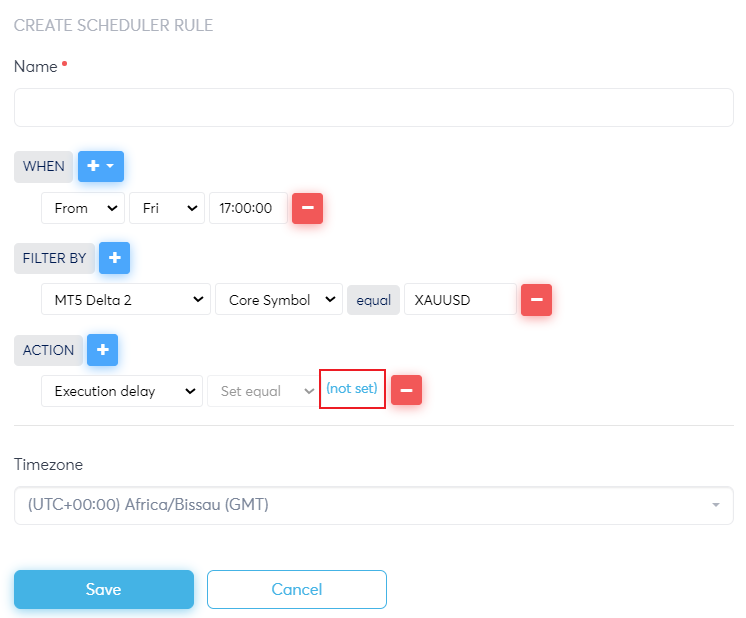
The new page, “Create scheduler rule“, will appear. It consists “Name“ field that should be filled with the name of the rule.
Beyond, the page contains three condition groups that help set up the rule: “when“ is responsible for the determination of time condition; “Filter by” governs the conditions for components (MT4/MT5) and their symbols; and “Action“ provides an opportunity to choose different broker options.
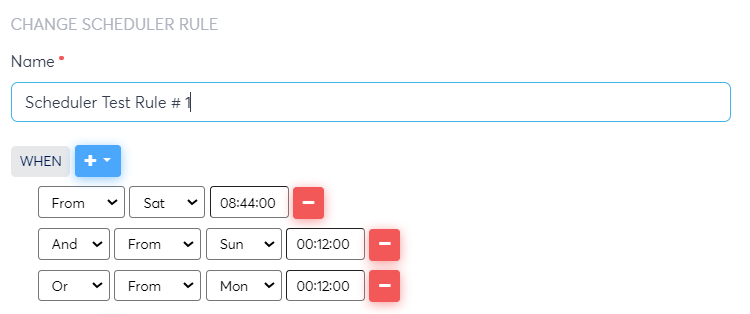
When condition group - a filter tunes up the time condition when the rule will be executed. It contains two possible options that can be seen in the drop-down menu. It is a “Single condition“ option and a “Group condition“option.
The singe condition option refers to the possibility of choosing only one time condition for the rule to be executed. This condition might appear in the form “from“a certain time, in the form of a certain period during which the rule will work and in the form of a certain component state of MT4/MT5 servers. Let’s consider them one by one.
From - when choosing this time condition and setting up a certain time (weekdays and exact time up to seconds), the rule will be executed infinitely after that time.
The group condition option entails the existence of several single conditions combined. To add a new condition, click on the blue “+“ button under the “When“ condition. To delete a condition, click on the red “-“ button next to the condition row.
When adding a new condition in the group condition mode, logical relations between the conditions can be chosen. Choosing “And“ and “Or“ logical operators is possible. Hence, when “and” is chosen, the two or several conditions must be enabled together for the rule to work. In the case of “or“, only one condition should be satisfied.
Filter by condition group helps select symbols for various client components (MT4/MT5). It can be done by choosing the correct components, and then the field that follows the “equal“ operator should be filled with the relevant name of the symbol. To add other symbols for another or the same components, please press the blue “+“ button next to the name of the condition group.
For MT4 components, it’s possible to choose either the “Taker symbol“ (MetaTrader symbol) or the “Core symbol“ (platform symbols). For MT5, only the core symbols are available at the moment.
Instead of specific symbols, symbols masks can be used. For instance, EURUSD* will cover all EURUSD symbols with the suffixes. And the mask "*" will cover all the symbol on MT4/MT5.
Please bear in mind, the mask * will change the parameter for all the symbols on MT4/MT5 individually. The default settings will be overwritten. To get the back, please set up them again on the Pricing page of MT4/MT5.

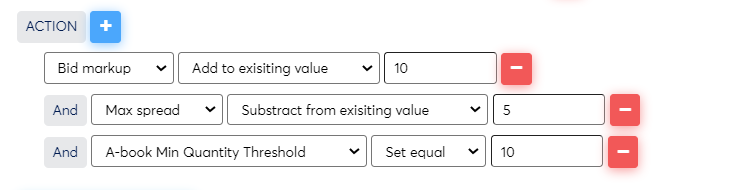
Finally, the Action condition group provides an opportunity to set several broker settings for the chosen symbols. Let’s consider all of them.
Bid markups - the markup for the bid for the symbol in the MT4/5 can be selected
Ask markup - the markup for the ask for the symbol in the MT4/5 can be selected
Min spread - the minimum spread for the symbol in the MT4/5 is defined by this condition
Max spread - the minimum spread for the symbol in the MT4/5 is defined by this condition
Min volume - when used, only lots that are bigger than this value will be processed by the MT4/MT5 (check!)
Max volume - when used, only lots that are smaller than this value will be processed by the MT4/MT5
A-book Min Quantity Threshold - all trades below the specified parameter will be executed as immediate or cancel (IOC), while all trades above this parameter will be executed as fill or kill (FOK)
Execution delay - the delay in ms during which the market execution might be selected
There are three options for all the above-mentioned parameters. The latter can be “set equal“ to a certain value, “add to existing value, “ or “subtract from existing value“.
Set equal means that under certain time conditions and for certain symbols, the value for certain parameters will be one that the user will input in the field.
Add to existing value means that input value will be added to the existing value for the parameter.
For instance, if the bid markup is 10, and the input value is 5 then when the rule works, the bid markup will be 15.
Subtract from existing value - means that the input value will be subtracted from the existing value for the parameter.
For instance, if the bid markup is 10, and the input value is 5, then when the rule works, the bid markup will be 5.
New action conditions can be added by pressing the blue “+“ button next to the name of the condition group. Again, new conditions can be added via the “and“ logical operator.
When all the settings are done, the “Save“ button can be pressed to put the rule into a waiting regime until its conditions are satisfied.
Scheduler for the Execution Delay
Execution delay has a separate UI for the configuration. To open the configuration window, one needs to click "Not set" hyperlink next to the parameter name
The new window will be opened

The window consists of four fields and the list of available rules. To create a new rule, one needs to fill in the fields and press "Add" button. The new rule row should be created. The rules can be removed (red button "Remove") or edited (blue button "Edit").
Let's consider the fields:
Min delay - the minimum value for the delay, in ms;
Max delay - the maximum value for the delay, in ms;
The algorithm selects random number from min to max number.
Groups - list of MT4/MT5 groups or group mask to which a rule applies;
Logins - list of logins to which a rule applies
When the scheduler rule for execution delay for specific symbol is created, the already existing values for execution delay will be replaced in the configuration file for MT4 Bridge/MT5 Delay. To roll them back as they were one needs to create a new rule in the Scheduler with the execution delay values as they were before.
All rules can be seen on the page “Scheduler rules“. Modifying, deleting, and copying them is possible by clicking the “Manage“ button next to the rules.